
Building your first coil

So you've finally taken the plunge into the world of rebuildables! Your shiny new RDA has arrived in the mail, you’ve opened up the box, dismantled the atomizer, looked at the empty posts and said “OK, now what?”
The first thing you need to learn is how to build a coil. This tutorial will show you how to build micro-coils, which is the only coil you will need until you're ready to try some of the more “out-there” coil configurations.
It’s called a micro-coil because it’s small, and the wraps of the coil all touch each other. Nothing scarier than that :-)
Setting up
Before we dive in, here are the tools you will need for the job:
- Kanthal resistance wire
- Small pliers
- Small tin snips or nail clippers
- Drill bit, small screwdriver or coiling wand
- Tweezers
- (optional) butane torch
- You will need to select a gauge of Kanthal – the best one to start with is 28AWG. This gives you a good all-purpose gauge that will be suitable for most, if not all of your initial builds.
- If using drill bits, either 1/8 or 1/16 is a good size, but this is purely personal preference – you will get to know the size you prefer.
- Ceramic tipped tweezers are the best but you can make do with the ones you steal from the bathroom cupboard - same as the nail clippers :-P
- Using a butane torch is optional; you can still wrap a perfectly fine coil without one.
- And as always, safety first. You will be dealing with red-hot metal and noxious fumes, so make sure the space is well ventilated, and try not to burn yourself! It hurts.
Wrapping up
For the purposes of this tutorial, here are my tools: 30W regulated box mod, Magma RDA, 28AWG Kanthal, small pliers, metal tweezers, nail clippers, 1/16 drill bit and a butane torch.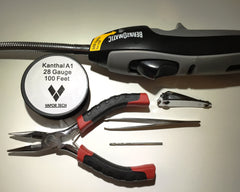
Unspool about 20cm of your Kanthal. You want plenty to work with until you get a feel for the ideal length, so don't hold back. Snip it off with your pliers or nail clippers.
(optional) Hold the Kanthal with your pliers and take to it with your butane torch. Run slowly along the length of the wire until every part of it has glowed. This burns off the grease and muck from the factory and takes away the “springiness” of the wire, making it easier to work with.
Hold the drill bit in your hand and hold one end of the wire against the flutes for grip. Take note of how much length I leave on the flute side.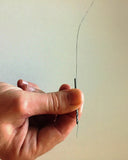
With the other hand, wrap the wire once around the shank. This is our starter wrap, so don't worry if it looks ugly.
Now, slowly continue wrapping the wire around the shank. Take your time to ensure each wrap touches the last as much as possible. Keep going until you've done ten full wraps.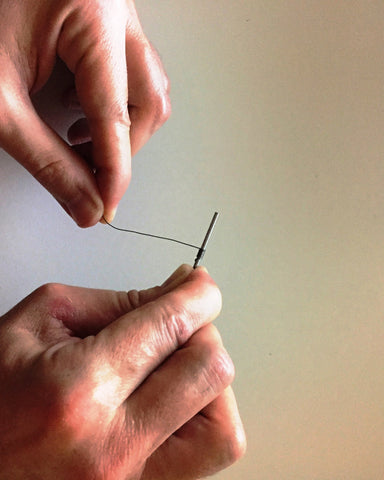
Now, carefully unwrap your starter wrap and straighten out the wire.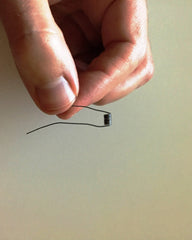
Voila! Here is your coil. If it’s anything like my first one, it will not be as pretty as the one in this photo! But don't worry. It takes practice, and Kanthal is cheap!
Burning in
You can work with your first one, or practice a few times until you have something better. But the next step of the process is burning in the coil.
You can pre-burn with a butane torch, direct burn by installing in the RDA and dry-firing, or you can do both.
If using butane torch:
Carefully place the coil in the tip of your pliers and apply gentle pressure.
Give it a blast with the torch until it glows, maintaining the gentle pressure. Five seconds should do the trick.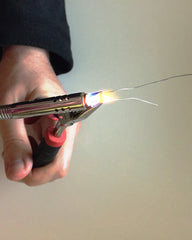
If using direct burn by dry-firing:
Install the coil in your RDA.
Remove the excess wire by either snipping it with your tin snips or nail clippers, or by wiggling the wire until it breaks off.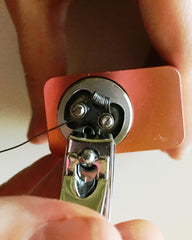

If using a mechanical mod, check the resistance using an ohms meter first. If you wrapped ten wraps, you should be reading around the 1 ohm mark. If the resistance of your coil does not match your setup, re-wrap the coil, using more or less wraps to change the resistance. This is important! The wrong resistance on a mech mod is a recipe for damage, so don't skip this step.
If using a regulated mod, you can adjust the power output to the correct level for your resistance, then fire it up! The coil will glow unevenly, and some smoke will probably appear. Keep firing until the smoke is gone.


Now this is the tricky bit: get your tweezers ready. Fire the coil until it’s red hot. Then, release the power button, and while the coil is still glowing, squeeze it with your tweezers so that the coil is nice and compact.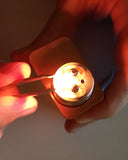
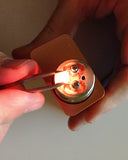

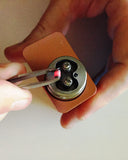
NOTE: please be careful! If you're not using ceramic tipped tweezers, you can short your system and/or give yourself a nasty little zap. Make sure the power button is released before touching your coil with metal tweezers.
After you've done the squeeze, fire it up again. Make sure the glow starts on the inside of the coil and moves outwards.


If it does – congratulations! Your coil is ready for wick installation!
In summary, this takes practice. There is no shortage of Kanthal in the world, so don't be afraid to chuck any messy ones in the bin and start again.
Next week we will take you to the next step – wicking with organic cotton sheets.
Comments
0 Comments